By: Team-F13-2 Since: Sep 2019 Licence: MIT
- 1. Introduction
- 2. Setting up
- 3. Design
- 4. Implementation
- 5. Documentation
- 6. Testing
- 7. Dev Ops
- Appendix A: Product Scope
- Appendix B: User Stories
- Appendix C: Use Cases
- Appendix D: Non Functional Requirements
- Appendix E: Glossary
- Appendix F: Instructions for Manual Testing
1. Introduction
$aveNUS is a desktop financial planning app that allows NUS students to plan their meals according to the amount of budget they set aside per meal in NUS. With $aveNUS, you can more effectively manage your expenses, save your favourite meal options within NUS, edit meal options, and even receive recommendations for meals that suit your budget.
This Developer Guide allows other developers to understand the design principles as well as implementation decisions behind $aveNUS. With this guide, developers can understand and contribute to $aveNUS easily.
The table below provides a quick summary of the symbols and formatting used in the guide.
|
Command that can be typed into the command box |
|
Success execution of command |
|
Tips that might be useful |
|
Additional information that is good to know |
|
Important pointers to take note |
2. Setting up
2.1. Prerequisites
-
JDK
11or above -
IntelliJ IDE
IntelliJ by default has Gradle and JavaFx plugins installed.
Do not disable them. If you have disabled them, go toFile>Settings>Pluginsto re-enable them.
2.2. Setting up $aveNUS in your computer
-
Fork this repo, and clone the fork to your computer
-
Open IntelliJ (if you are not in the welcome screen, click
File>Close Projectto close the existing project dialog first) -
Set up the correct JDK version for Gradle
-
Click
Configure>Project Defaults>Project Structure -
Click
New…and find the directory of the JDK
-
-
Click
Import Project -
Locate the
build.gradlefile and select it. ClickOK -
Click
Open as Project -
Click
OKto accept the default settings.
2.3. Verifying the setup
-
Run the
seedu.savenus.Mainand try a few commands -
Run the tests to ensure they all pass.
2.4. Configurations to do before writing code
2.4.1. Configuring the coding style
This project follows oss-generic coding standards. IntelliJ’s default style is mostly compliant with ours but it uses a different import order from ours. To rectify,
-
Go to
File>Settings…(Windows/Linux), orIntelliJ IDEA>Preferences…(macOS) -
Select
Editor>Code Style>Java -
Click on the
Importstab to set the order-
For
Class count to use import with '*'andNames count to use static import with '*': Set to999to prevent IntelliJ from contracting the import statements -
For
Import Layout: The order isimport static all other imports,import java.*,import javax.*,import org.*,import com.*,import all other imports. Add a<blank line>between eachimport
-
Optionally, you can follow the UsingCheckstyle.adoc document to configure Intellij to check style-compliance as you write code.
2.4.2. Updating documentation to match your fork
After forking the repo, the documentation will still have the SE-EDU branding and refer to the se-edu/addressbook-level3 repo.
If you plan to develop this fork as a separate product (i.e. instead of contributing to se-edu/addressbook-level3), you should do the following:
-
Configure the site-wide documentation settings in
build.gradle, such as thesite-name, to suit your own project. -
Replace the URL in the attribute
repoURLinDeveloperGuide.adocandUserGuide.adocwith the URL of your fork.
2.4.3. Setting up CI
Set up Travis to perform Continuous Integration (CI) for your fork. See UsingTravis.adoc to learn how to set it up.
After setting up Travis, you can optionally set up coverage reporting for your team fork (see UsingCoveralls.adoc).
| Coverage reporting could be useful for a team repository that hosts the final version but it is not that useful for your Personal fork. |
Optionally, you can set up AppVeyor as a second CI (see UsingAppVeyor.adoc).
| Having both Travis and AppVeyor ensures your App works on both Unix-based platforms and Windows-based platforms (Travis is Unix-based and AppVeyor is Windows-based) |
2.4.4. Getting started with coding
When you are ready to start coding, we recommend that you get some sense of the overall design by reading about $aveNUS’s architecture.
3. Design
3.1. Architecture
The Architecture Diagram given above explains the high-level design of the App. Given below is a quick overview of each component.
The .puml files used to create diagrams in this document can be found in the diagrams folder.
Refer to the Using PlantUML guide to learn how to create and edit diagrams.
|
-
At app launch: Initializes the components in the correct sequence, and connects them up with each other.
-
At shut down: Shuts down the components and invokes cleanup method where necessary.
Commons represents a collection of classes used by multiple other components.
The following class plays an important role at the architecture level:
-
LogsCenter: Used by many classes to write log messages to the App’s log file.
The rest of the App consists of four components.
Each of the four components
-
Defines its API in an
interfacewith the same name as the Component. -
Exposes its functionality using a
{Component Name}Managerclass.
For example, the Logic component (see the class diagram given below) defines it’s API in the Logic.java interface and exposes its functionality using the LogicManager.java class.
How the architecture components interact with each other
The Sequence Diagram below shows how the components interact with each other for the scenario where the user issues the command delete 1.
delete 1 commandThe sections below give more details of each component.
3.2. UI component
API : Ui.java
The UI consists of a MainWindow that is made up of parts e.g.CommandBox, ResultDisplay, FoodListPanel, PurchaseListPanel, SavingsHistoryPanel, StatusBarFooter, etc. All these, including the MainWindow, inherit from the abstract UiPart class.
There are pop-up windows that appear when user calls the InfoCommand or HelpCommand which is a new window with their own stages. The CSS files for each pop-up windows is taken from the MainWindow which ensures that they always match the theme of the MainWindow should the user decide to switch the theme while either pop-up window is open.
The UI component uses JavaFx UI framework. The layout of these UI parts are defined in matching .fxml files that are in the src/main/resources/view folder. For example, the layout of the MainWindow is specified in MainWindow.fxml
The UI component,
-
Executes user commands using the
Logiccomponent. -
Responds to the user’s keyboard and mouse input.
-
Pop-up windows respond to the buttons on the menu tab.
-
Button on the menu tab which acts as substitute for keyboard input for single-word commands.
-
Each usage of the menu tab buttons will update the Food list accordingly.
-
Listens for changes to
Modeldata so that the UI can be updated with the modified data.
3.3. Logic component
API :
Logic.java
-
Logicuses theSaveNusParserclass to parse the user command. -
This results in a
Commandobject which is executed by theLogicManager. -
The command execution can affect the
Model(e.g. adding a food item). -
The result of the command execution is encapsulated as a
CommandResultobject which is passed back to theUi. -
In addition, the
CommandResultobject can also instruct theUito perform certain actions, such as displaying help to the user.
Given below is the Sequence Diagram for interactions within the Logic component for the execute("delete 1") API call.
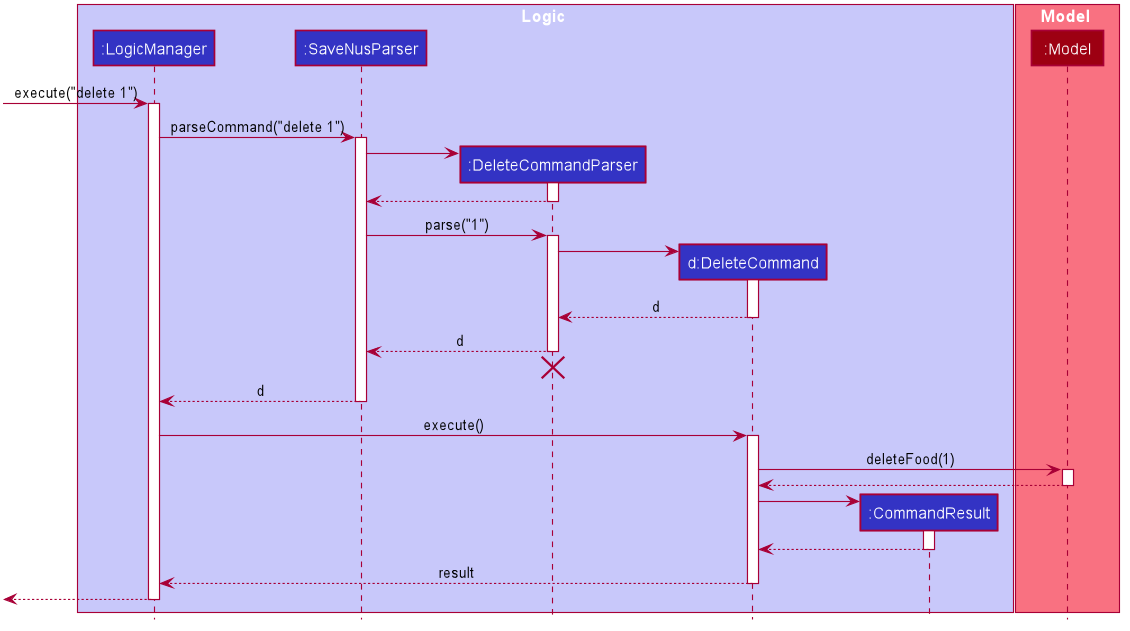
delete 1 Command
The lifeline for DeleteCommandParser should end at the destroy marker (X) but due to a limitation of PlantUML, the lifeline reaches the end of diagram.
|
3.4. Model component

API : Model.java
The Model,
-
stores a
UserPrefobject that represents the user’s preferences. -
stores the Menu data.
-
stores the Wallet data.
-
stores the Info data.
-
stores the SavingsAccount data.
-
stores the PurchaseHistory data.
-
exposes the
RemainingBudgetandDaysToExpirethat can be 'observed' e.g. the UI can be bound to these values so that the UI automatically updates when the data in theWalletchange. -
exposes the
Savingsthat can be 'observed' e.g. the UI can be bound to these values so that the UI automatically updates when the data in theSavingsAccountchanges. -
exposes an unmodifiable
ObservableList<Food>,ObservableList<Savings>andObservableList<Purchase>that can be 'observed' e.g. the UI can be bound to this list so that the UI automatically updates when the data in either of the lists change. -
does not depend on any of the other three components.
3.4.1. Food component in Model
The Food,
-
stores information on
Name,PriceandCategorywhich are compulsory fields. -
stores information on
Description,Opening HoursandRestrictionswhich are optional fields. -
stores information
Tagwhich are retrieved from theUniqueTagList.
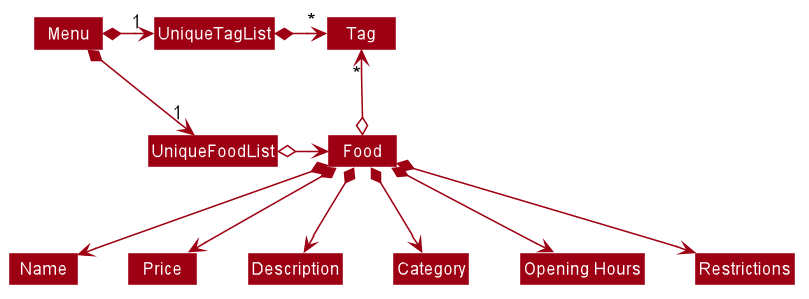
As a more OOP model, we can store a Tag list in Menu, which Food can reference.
This would allow Menu to only require one Tag object per unique Tag,
instead of each Food needing their own Tag object.
|
3.4.2. Design considerations for Food-related Models
When implementing Food-related models, it is important not to add duplicate foods. As the user only requires to enter the name, price and category as they are compulsory fields, we need to ensure that this does not happen.
For example, you would not want to add Chicken Rice twice into the food list. As a result, our team went through several alternatives to deal with this consideration.
| Alternative 1 (Chosen Implementation) | Alternative 2 |
|---|---|
|
|
We chose alternative 1 because there can be multiple instances of Food with different Name but same Category. For
example, an instance of Chicken Rice from a Chinese stall may be different from an instance of Chicken Rice from an Indian
stall. As a result, we would want to be able to add these 2 food items into the food list.
3.5. Storage component
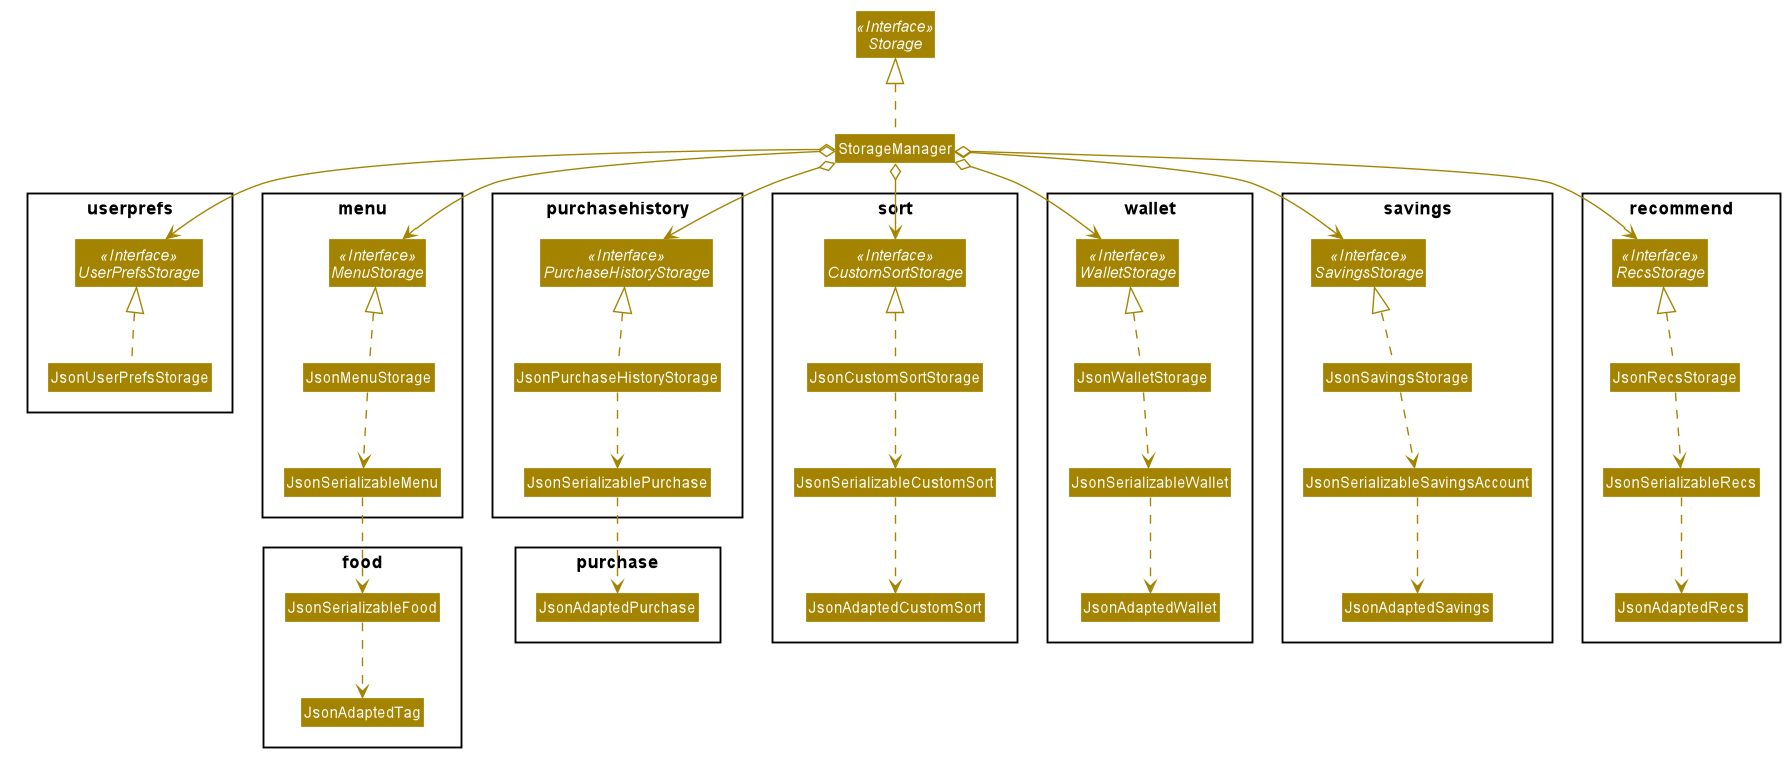
API : Storage.java
The Storage component,
-
can save
UserPrefobjects in json format and read it back. -
can save the
Menudata in json format and read it back. -
can save the
Walletdata in json format and read it back. -
can save the
PurchaseHistorydata in json format and read it back. -
can save the
SavingsHistorydata in json format and read it back.
3.6. Common classes
Classes used by multiple components are in the seedu.savenus.commons package.
4. Implementation
This section describes some noteworthy details on how certain features are implemented.
4.1. Logging
We are using java.util.logging package for logging. The LogsCenter class is used to manage the logging levels and logging destinations.
-
The logging level can be controlled using the
logLevelsetting in the configuration file (See Section 4.2, “Configuration”) -
The
Loggerfor a class can be obtained usingLogsCenter.getLogger(Class)which will log messages according to the specified logging level -
Currently log messages are output through:
Consoleand to a.logfile.
Logging Levels
-
SEVERE: Critical problem detected which may possibly cause the termination of the application -
WARNING: Can continue, but with caution -
INFO: Information showing the noteworthy actions by the App -
FINE: Details that is not usually noteworthy but may be useful in debugging e.g. print the actual list instead of just its size
4.2. Configuration
Certain properties of the application can be controlled (e.g user prefs file location, logging level) through the configuration file (default: config.json).
4.3. Sorting feature
The Sorting feature allows users to sort their food items based on certain FIELD and DIRECTION. The FIELD and
DIRECTION are as followed:
The FIELD and DIRECTION can be entirely in Upper or Lower Case.
|
First and foremost, users will be able to sort the food items based on their default ordering.
The default ordering is based on ascending price, name and then category. This is done using the default command.+
Not only that, they will be able to implement their own custom comparator using makesort. From this, they should be able to use customsort and autosort`.
customsort sorts the food items based on the custom comparator, where autosort sorts the food items every time there is an edit to the food list.
4.3.1. Classes for sorting feature in Model
The Sorting feature was implemented with a new set of classes introduced to the Model.
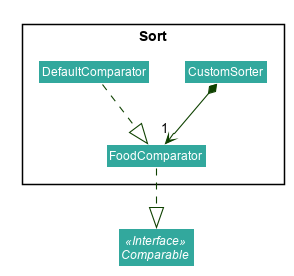
From the model, the CustomSorter stores the comparator for autosort and makesort.
From which, you will need to call makesort FIELD DIRECTION to create the custom comparator. The CustomSorter contains a FoodComparator.
The FoodComparator stores fields which will be needed for various Food to be compared.
The DefaultComparator helps to sort food items based on their natural ordering. This is called via the default command.
When default is called, the food list will be sorted according to ascending category, ascending name and ascending price.
Detailed below are the design considerations taken into account when engineering the DefaultComparator and FoodComparator
classes.
| Alternative 1 (Chosen Implementation) | Alternative 2 |
|---|---|
|
|
As a result, we have chosen alternative 1. By specifying the specific fields in the body of constructor in
the DefaultComparator, it makes it easier for future developers to create their own form of DefaultComparator.
Not only that, it saves time and reduces duplicate code.
4.3.2. Creation of new Custom Comparator
The user may wish to create a new custom comparator. This can be done with the makesort command.
The sequence diagram for interactions between the Logic, Model and Storage components when a user executes the makesort command is shown below.
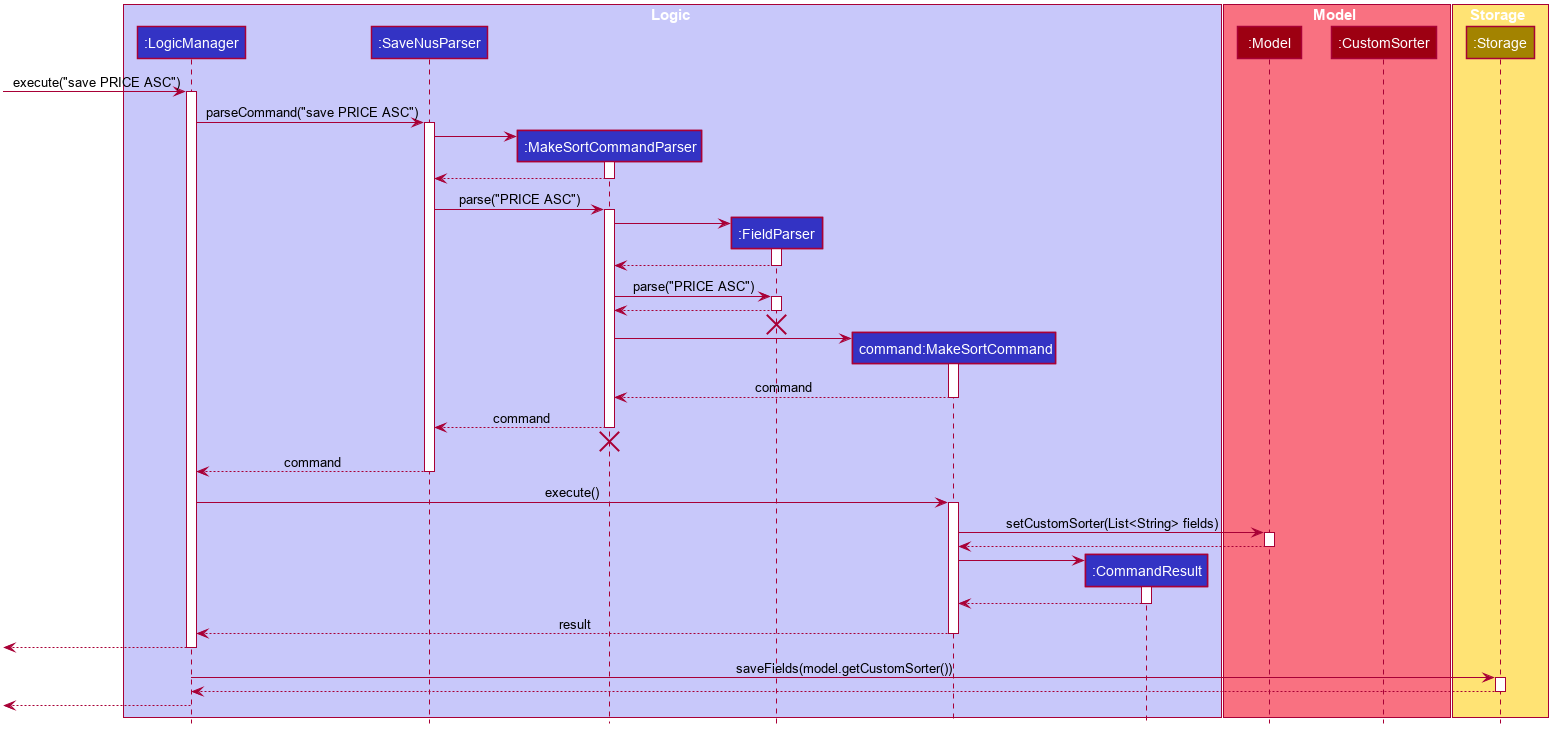
The user may want to create a new custom comparator. This can be done with the makesort command.
The fields are stored in the FoodComparator in the CustomSorter object, which stores the necessary fields
as a list.
The current implementation for creating a new CustomSorter is done by overwriting the existing CustomSorter, with a new
CustomSorter with the desired fields.
The command is read as a text string from the command box in the UI and then is executed by calling MainWindow#executeCommand(), which passes this string (named commandText) to the Logic component by calling Logic#execute(Model model).
The following activity diagram below summarizes how the save command works
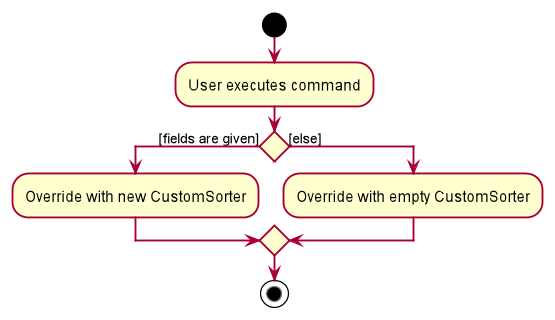
If fields are given, the original CustomSorter is overridden by a new CustomSorter with new fields. Else, the original CustomSorter is overridden by a new CustomSorter with no fields.
4.3.3. Sorting of the Food list
After the customization of the Custom Comparator, the user can now call the customsort command to sort the food items based
on the fields specified. For example, if the fields specified are PRICE ASC NAME DESC, the system will sort the food items in order
of ascending price. If two items have the same price, they will be ranked according to their names using lexicographic
comparison.
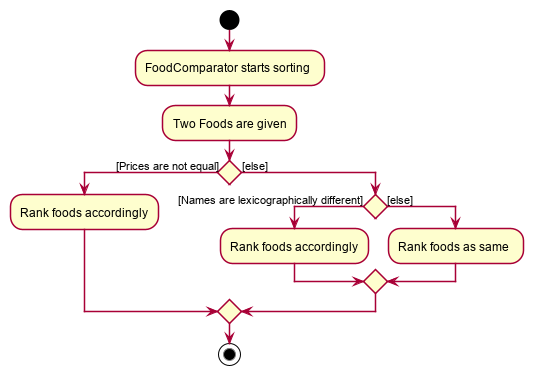
If two foods have the same price, they will compared using lexicographical ordering based on their names. If they are lexicographically similar, their ranks do not change.
Name |
Price ($) |
Ranking (Price) |
Overall Ranking |
Chicken Rice |
2.80 |
2 |
2 |
Nasi Lemak |
2.80 |
2 |
3 |
Fried Rice |
4.00 |
4 |
4 |
Dim Sum |
1.80 |
1 |
1 |
From the table above, we can see Dim Sum will be ranked at the top as it is the cheapest. On the other hand, Fried Rice will be ranked at the bottom as it is the most expensive food item.
As Chicken Rice and Nasi Lemak have the same price, they will compared using lexicographical ordering based on their names. Chicken Rice still has a higher ranking than Nasi Lemak as Chicken Rice is lexicographically smaller than Nasi Lemak.
4.4. Savings feature
The Savings feature encompasses a Savings Account feature and a Savings History feature, both of which work together to allow the user to track his/her savings effectively.
The Savings Account feature allows users to save a specified amount of money from their wallet into their savings account using the save AMOUNT command, where AMOUNT is a user defined amount of money to deposit into the user’s savings account.
The feature also allows the user to withdraw money from his/her savings account, direcly into his/her $aveNUS wallet. This is accomplished using the withdraw AMOUNT command.
Meanwhile, the Savings History feature is also introduced to allow $aveNUS users to keep track of all their savings and withdrawals. This is available by clicking the "Savings" tab located below the Savings Account and Wallet display.
Also, users can choose to view their savings or withdrawals only, by calling the show TO_DISPLAY command. This allows the user to have a quick overview of his savings/withdrawals history to decide
if he/she has been saving enough or not. TO_DISPLAY must either be savings/
withdrawals/both, whereby the TO_DISPLAY input is case-insensitive, i.e. show SaVinGs and show savings are valid inputs.
4.4.1. Classes for Savings Account feature in Model
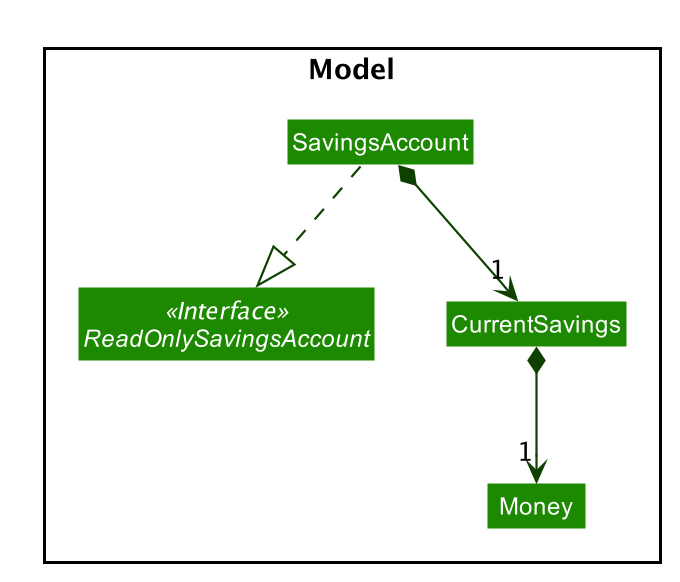
The Savings Account feature was implemented with the introduction of a new set of classes into the Model. A new SavingsAccount class encapsulates all the methods and classes
related to this feature. The SavingsAccount object is stored in $aveNUS and it exposes only a read-only interface, ReadOnlySavingsAccount, to allow other components to retrieve
the retrieve information within the user’s SavingsAccount, while maintaining data integrity.
SavingsAccount contains a single instance of the CurrentSavings class, a class we implemented to allow greater abstraction of the user’s current savings value.
CurrentSavings is only called once throughout the application and is modified with package-protected methods within the class itself.
This allows the CurrentSavings itself to be unmodifiable in other components in the application except within the SavingsAccount itself.
Within CurrentSavings, there is an unmodifiable Money class. Once a CurrentSavings object is created with a fixed value, it cannot be changed.
The SavingsAccount Class Diagram below shows the relationship between the classes mentioned above.
4.4.2. Classes for Savings History feature in Model
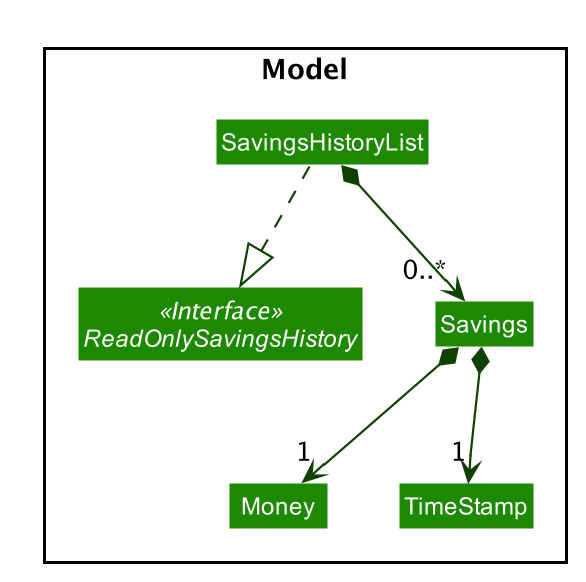
Also, the Savings History feature was implemented with another set of classes introduced to the Model. It includes a new SavingsHistory class, which contains all the methods
related to this feature. The SavingHistory object exposes only a read-only interface, ReadOnlySavingsHistory, to allow other components within the application to retrieve the savings
history of the user.
Within the SavingsHistory object, it contains all the methods to interact with the SavingsHistoryList object. Hence,
Each SavingsHistory object only has ONE unmodifiable SavingsHistoryList object.
The SavingsHistoryList class acts as an abstraction of a list, which sole purpose is to store all Savings made by the user.
Withdrawals and savings made by the user are both objects of the class Savings. Within the Savings class, there are 3 unmodifiable attributes:
-
Moneywhich is a class that contains the value of theSavingsmade. It is a negative value if a withdrawal is made, and a positive value if a saving was made. -
TimeStampwhich is a class that contains the time in which theSavingsobject was created, i.e. what time the saving/withdrawal was made by the user. -
isWithdrawwhich is a boolean that istrueif theSavingsobject is a withdrawal, and false if the object is a saving.
The SavingsHistory Class Diagram is shown below to reflect the interactions above.
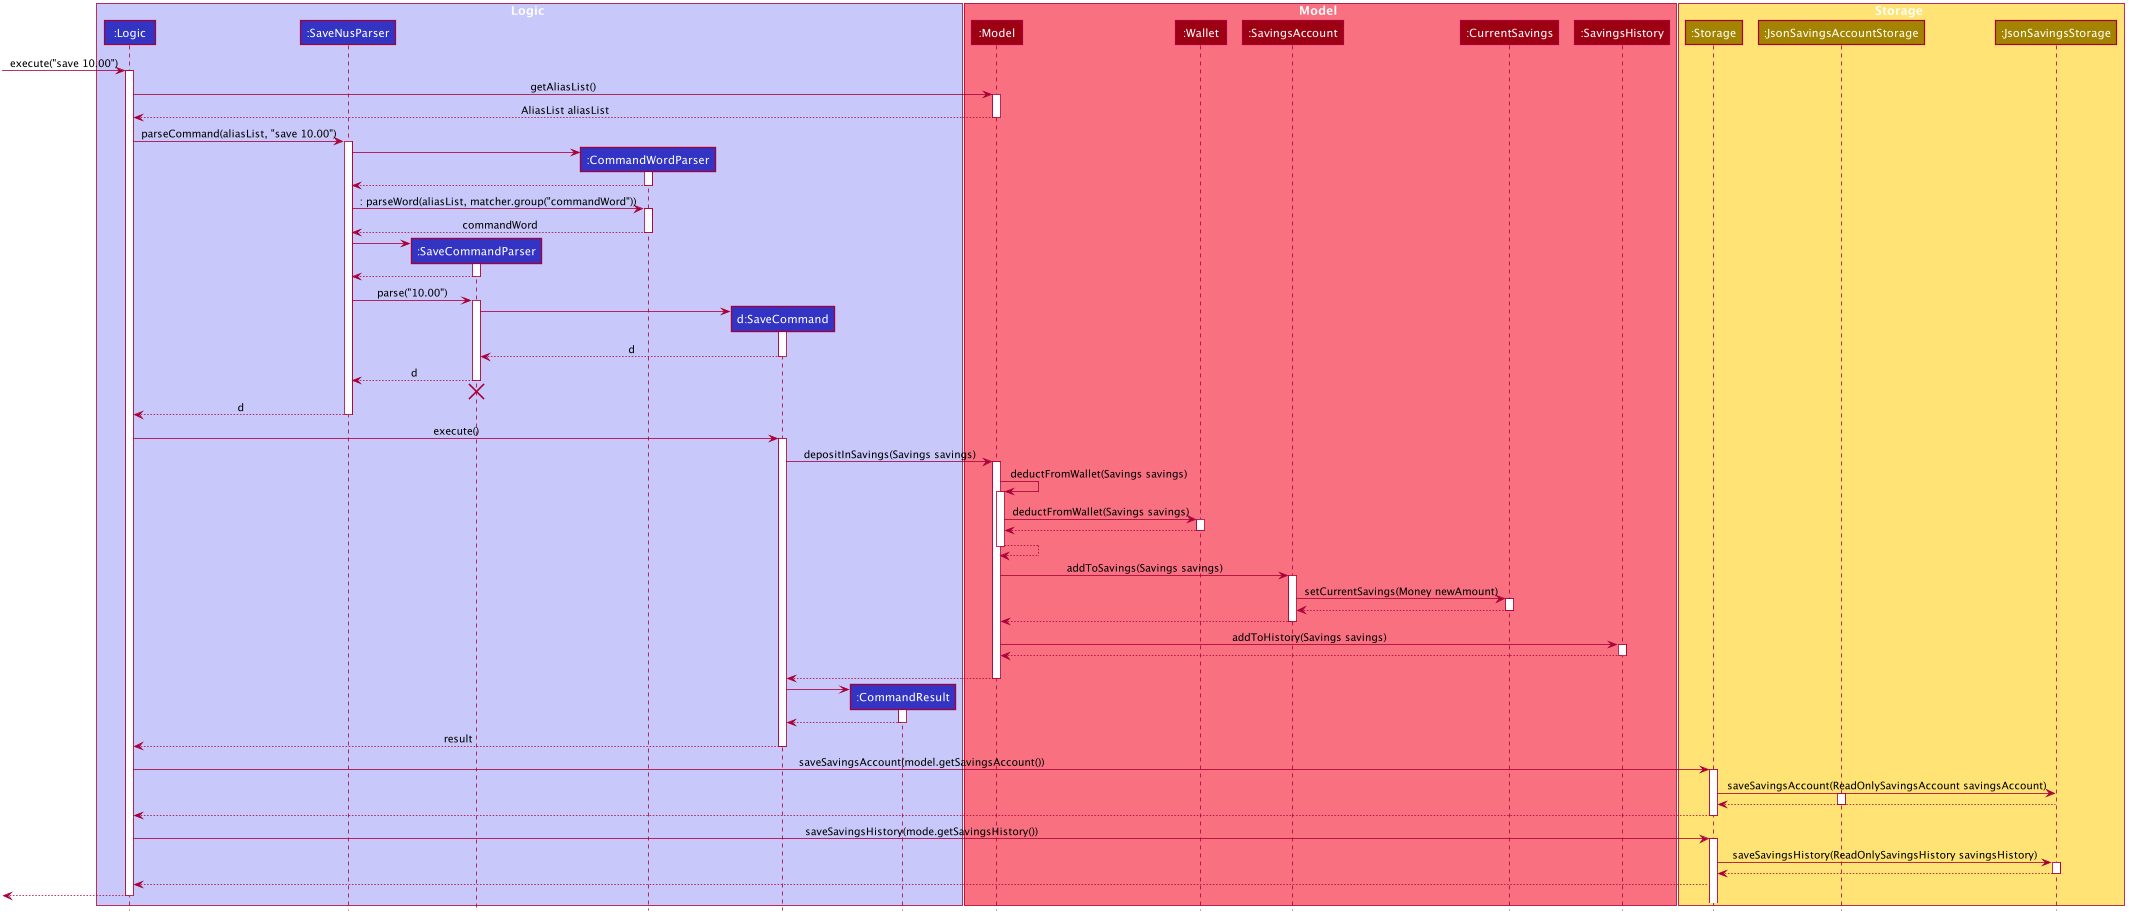
4.4.3. Making a saving in $aveNUS
When a user requests for a saving to be made in the application by calling the save AMOUNT command, the following processes
will occur internally within the application:
-
The
AMOUNTspecified by the user is deducted from the user’s wallet. -
The
AMOUNTspecified by the user is added into the user’s saving account. -
The saving is reflected in the savings history.
If the user enters an AMOUNT that is negative, a ParseException is thrown. This exception is thrown from ParserUtil#parseSavings(savings).
|
Deduction of savings amount from user’s wallet
A Savings object is instantiated in the SaveCommand with the user’s input. It contains information about how much Money
was saved, and the TimeStamp of the savings made. The Money object contains the amount of savings made, and the TimeStamp
object contains the time and date the saving was made by the user.
When SaveCommand#execute() is called, model#depositInSavings(savingsAmount) is called. Within the Model of $aveNUS, the user’s
wallet is checked. If the user attempts to save more money than he/she has in his/her wallet, they will be prompted that the command
is invalid.
If the check passes, the saving amount is deducted from the user’s account within the Model.
Adding of savings amount into user’s savings account.
Subsequently after the savings amount is deducted from the wallet, savingsAccount#addToSavings(savings)
is called in the Model class. This method call will result in the addition of the savings into the SavingsAccount.
Adding of the savings into the user’s saving history
After the savings is added into the user’s savings account, model#addToHistory(savingsAmount) is called, and the details
of the savings are added into the SavingsHistoryList, found within the SavingsHistory object.
The following sequence diagram shows how the making of a saving works:
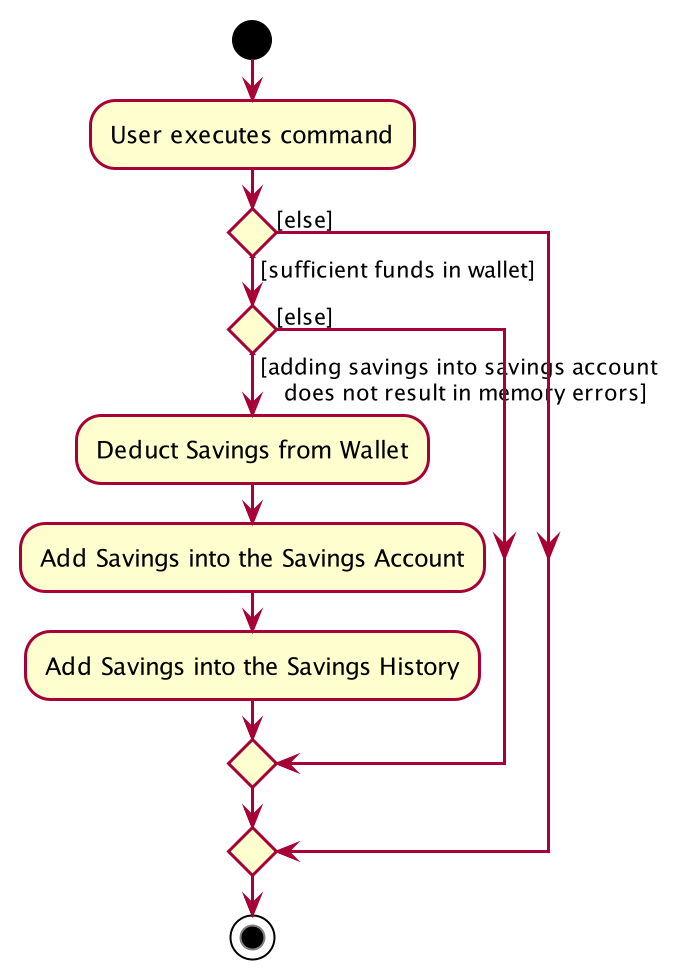
The following activity diagram summarises what happens when a user executes a SaveCommand:
Design Considerations
Detailed below are the design considerations taken into account when engineering the
model#depositInSavings(savingsAmount) function.
| Alternative 1 (Chosen Implementation) | Alternative 2 |
|---|---|
Make
|
Make
|
4.4.4. Making a withdrawal from user’s savings account.
Similar to making a saving, the following steps occur when the user requests for a withdrawal.
-
The
AMOUNTspecified by the user is deducted from the user’s savings account. -
The
AMOUNTspecified by the user is added into the user’s wallet. -
The withdrawal is reflected in the savings history.
If the user enters an AMOUNT that is negative, a ParseException is thrown. This exception is thrown from ParserUtil#parseSavings(savings).
|
Deduction of withdrawal amount from user’s savings account.
A Savings object is instantiated in the WithdrawCommand with the user’s input. Because a withdrawal is subtracted from the savings account, the withdrawal is a Savings object
recorded with a negative value.
It contains information about how much Money was withdrawn, and the TimeStamp of the withdrawal made. The Money object contains the amount to withdraw, and the TimeStamp
object contains the time and date the withdrawal was made by the user.
When WithdrawCommand#execute() is called, model#withdrawFromSavings(savings) is called. Within the Model of $aveNUS, the user’s
savings account is checked. If the user attempts to withdraw more money than he/she has in the savings account, they will be prompted that the command
is invalid.
Once the check is passed, a check is done in the wallet described in the section below.
Adding of savings amount into user’s wallet.
Before the savings amount is deducted from the savings account, a check is done to make sure that the addition of the withdrawal into the user’s wallet will not result in the budget amount in the wallet to be great than $1,000,000.
Only when this check is passed, the savings amount is added into the user’s wallet, using the command wallet#setRemainingBudget(newRemainingBudget).
The savings amount is subsequently deducted from the savings account using the command savingsAccount#deductFromSavings(savings). Note again that the savings
is of a negative value since this is a withdrawal.
Adding of the withdrawals into the user’s saving history
After a successful deduction from the savings account, model#addToHistory(savingsAmount) is called, and the details
of the savings are added into the SavingsHistoryList, found within the SavingsHistory object.
Design Considerations
Detailed below are the design considerations taken into account when engineering the
Savings class.
| Alternative 1 | Alternative 2 (Chosen Implementation) |
|---|---|
Make a
|
Make a
|
4.4.5. Viewing only the savings/withdrawals made by the user.
Upon the request of the user to display only the savings he/she makes using, for example, show savings, a
ShowCommand object is created. It is then executed in the application’s Logic, and this returns
a CommandResult which is instantiated with two booleans: showSavingsOnly and showWithdrawalsOnly.
Within the MainWindow class of the application, these booleans are checked upon the calling of mainWindow#executeCommand(commandText).
In the example of the show savings input by the user, showSavingsOnly will be true and showWithdrawalsOnly will be false.
This leads to the call to ReadOnlySavingsHistory#getSavingsOnly() method within the ReadOnlySavingsHistory class. This call
returns an unmodifiable list of savings made by the user thus far.
Finally, the savings history panel in the MainWindow class is updated with this unmodifiable list. The result
is that the user will see only his savings being displayed within the application’s savings history panel.
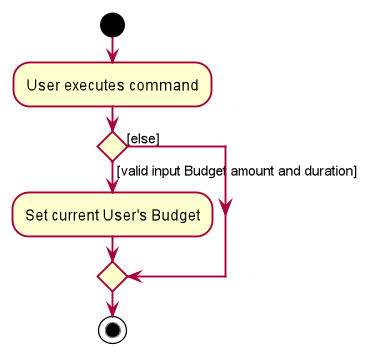
4.5. Budget Tracking feature
The Budget Tracking feature allows users to manage their budget for food expenditure. It keeps the user updated with regards to the amount as well as the duration left for their current budget. Budget information is also used in the application’s recommendation system to suggest appropriate food items within a user’s budget.
4.5.1. Classes for Budget Tracking feature in Model
The Budget Tracking feature was implemented with the following classes.
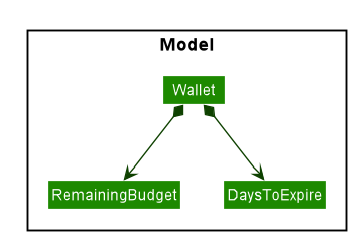
RemainingBudget
Also, in order to avoid possible loss of precision errors, a Money class is used. This design decision is discussed below.
|
DaysToExpire
| Due to development constraints, we have decided to only update the budget duration every time the application is started up instead of constantly monitoring the actual time to update this property. |
Design considerations
Below are some design considerations when implementing Budget-related models.
| Alternative 1 (Chosen Implementation) | Alternative 2 |
|---|---|
Creating a
|
Making use of Java’s primitive
|
We chose alternative 1 mainly due to the fact that the loss of precision is extremely apparent to the user. From our testing, after the user buys 3 or 4 items, the precision error adds up resulting in a difference of 1 cent between the expected and actual budget amount. This may confuse the user and is a bug that we wish to avoid.
4.5.2. Setting a Budget
A budget can be set using the budget command which takes a budget amount, and an optional budget duration.
For example, budget 100 10 will set the user’s budget, with $100.00 for 10 days.
The sequence diagram for interactions between the Logic, Model and Storage components when a user executes the buy 1 command is shown below.
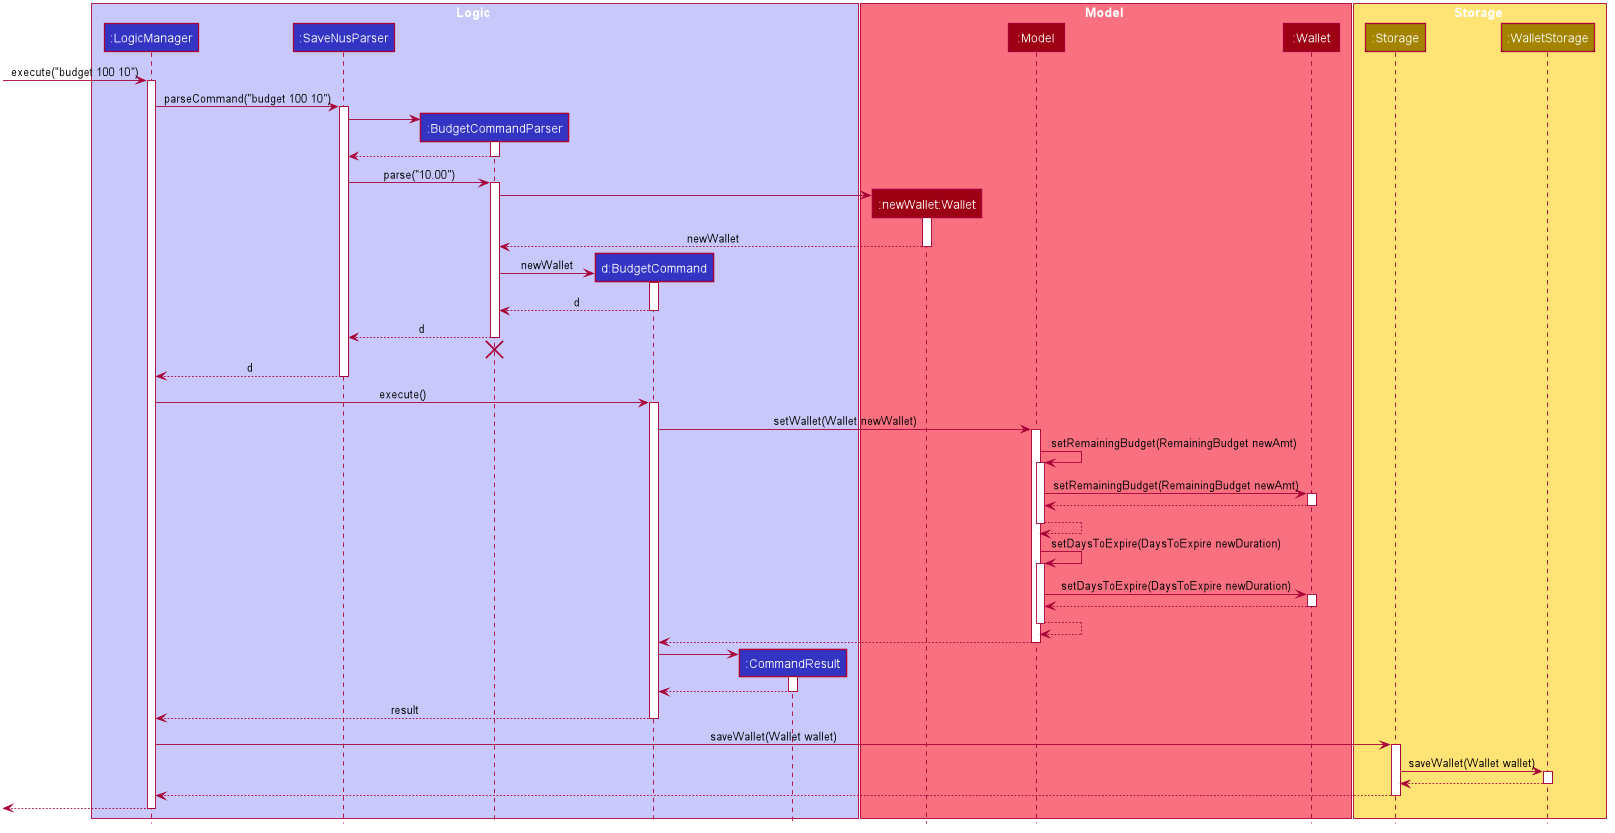
budget 100 10 commandThe following activity diagram below summarizes how budget commands works
budget command4.6. Purchase Tracking feature
The Purchase Tracking feature allows users to monitor their food expenditure by keeping track of their purchase history.
Whenever a user’s executes the buy command, the corresponding food will be added as a purchase to the purchase history.
A user’s purchase history is displayed in the UI, similar to the food menu, and is updated every time a change is made to it.
4.6.1. Classes for Purchase Tracking feature in Model
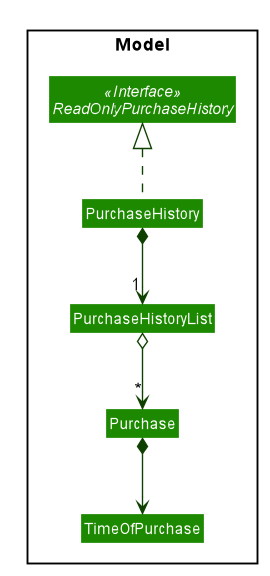
The Purchase Tracking feature was implemented with the following classes.
Design considerations
Below are some design considerations when implementing Purchase-related models.
| Alternative 1 (Chosen Implementation) | Alternative 2 |
|---|---|
Storing the purchased food item as a
|
Creating an additional immutable
|
We chose alternative 1 due to the fact that Food is implemented as a immutable class.
Therefore, we are able to get the required from the Food object the user selected to construct the new purchased Food object.
And at the same time, ensure the data integrity of that information.
Also, by encapsulating the Food object within the Purchase object and making it a private field, we are able to ensure that the purchased Food is not modified in an unintended manner.
4.6.2. Buying a Food Item
The user may want to buy a food item and record the purchase. This can be done with the buy command.
After the users enters a buy command, for example, buy 1 which buys the first item in the displayed list.
The sequence diagram for interactions between the Logic, Model and Storage components when a user executes the buy 1 command is shown below.
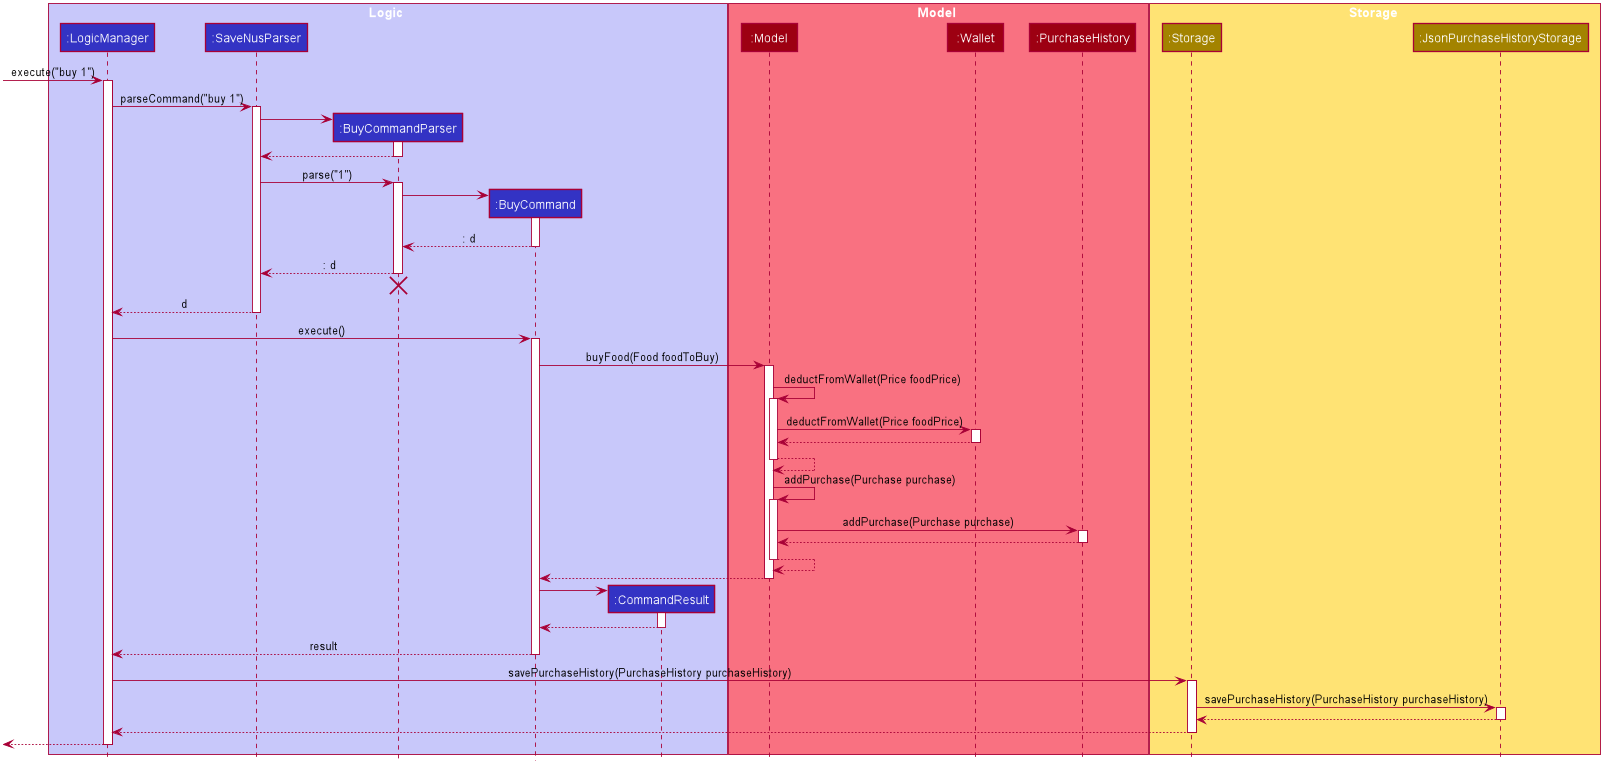
buy 1 commandThe following activity diagram below summarizes how buy commands works
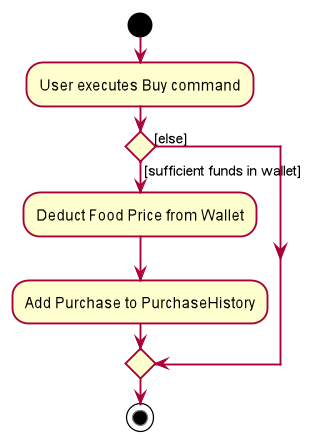
buy command4.7. Recommendation feature
The recommendation feature allows users to generate a list of personalized recommendations using the recommend command.
The recommendations are tailored to each user based on the factors below:
Users are able to add their liked and disliked categories, tags and locations into the app using the like and dislike
command. The recommendation system will then take into account these preferences, in addition to their purchase history,
to generate a more accurate list of recommendations. Users will then able to find the food that they are likely to enjoy
more accurately.
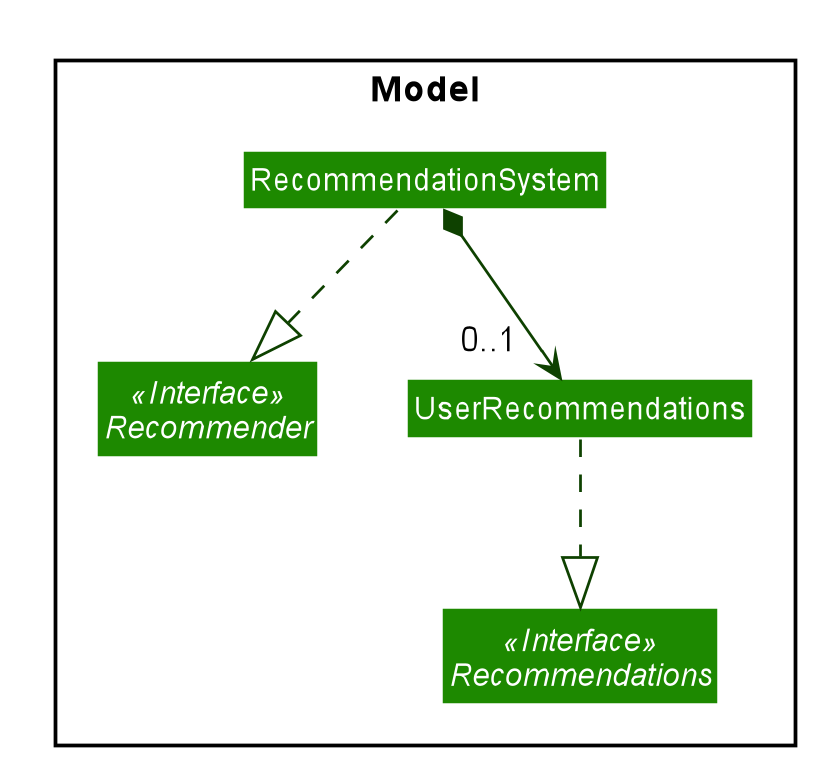
4.7.1. Classes for recommendation feature in Model
With the addition of the recommendation feature, a new set of classes were implemented to support the feature.
A singleton class RecommendationSystem encapsulates the methods and classes related to this feature.
This RecommendationSystem class implements the interface Recommender which specifies the behaviour of the system,
and include the ability to generate recommendation values.
Additionally, the RecommendationSystem class also contains a class UserRecommendations, which include the likes and
dislikes of the user. The functionality of UserRecommendations is specified by the Recommendations interface,
encompassing the ability to add and remove likes and dislikes, among other features.
The UserRecommendations object contain 6 sets, namely:
The items stored in the sets are first converted to lowercase before adding them so that a case-insensitive comparison can be done more easily.
The class diagram below illustrates the relationship between the classes.
4.7.2. Adding likes and dislikes
The feature of adding the user’s liked and disliked categories, tags and locations was introduced to support the recommendation system.
The UserRecommendations class stores the list of user likes and dislikes as a set in lowercase to prevent duplicates.
Furthermore, the user’s likes and dislikes are integrated with Storage for the user’s convenience.
The sequence diagram below shows how a sample like command is executed:
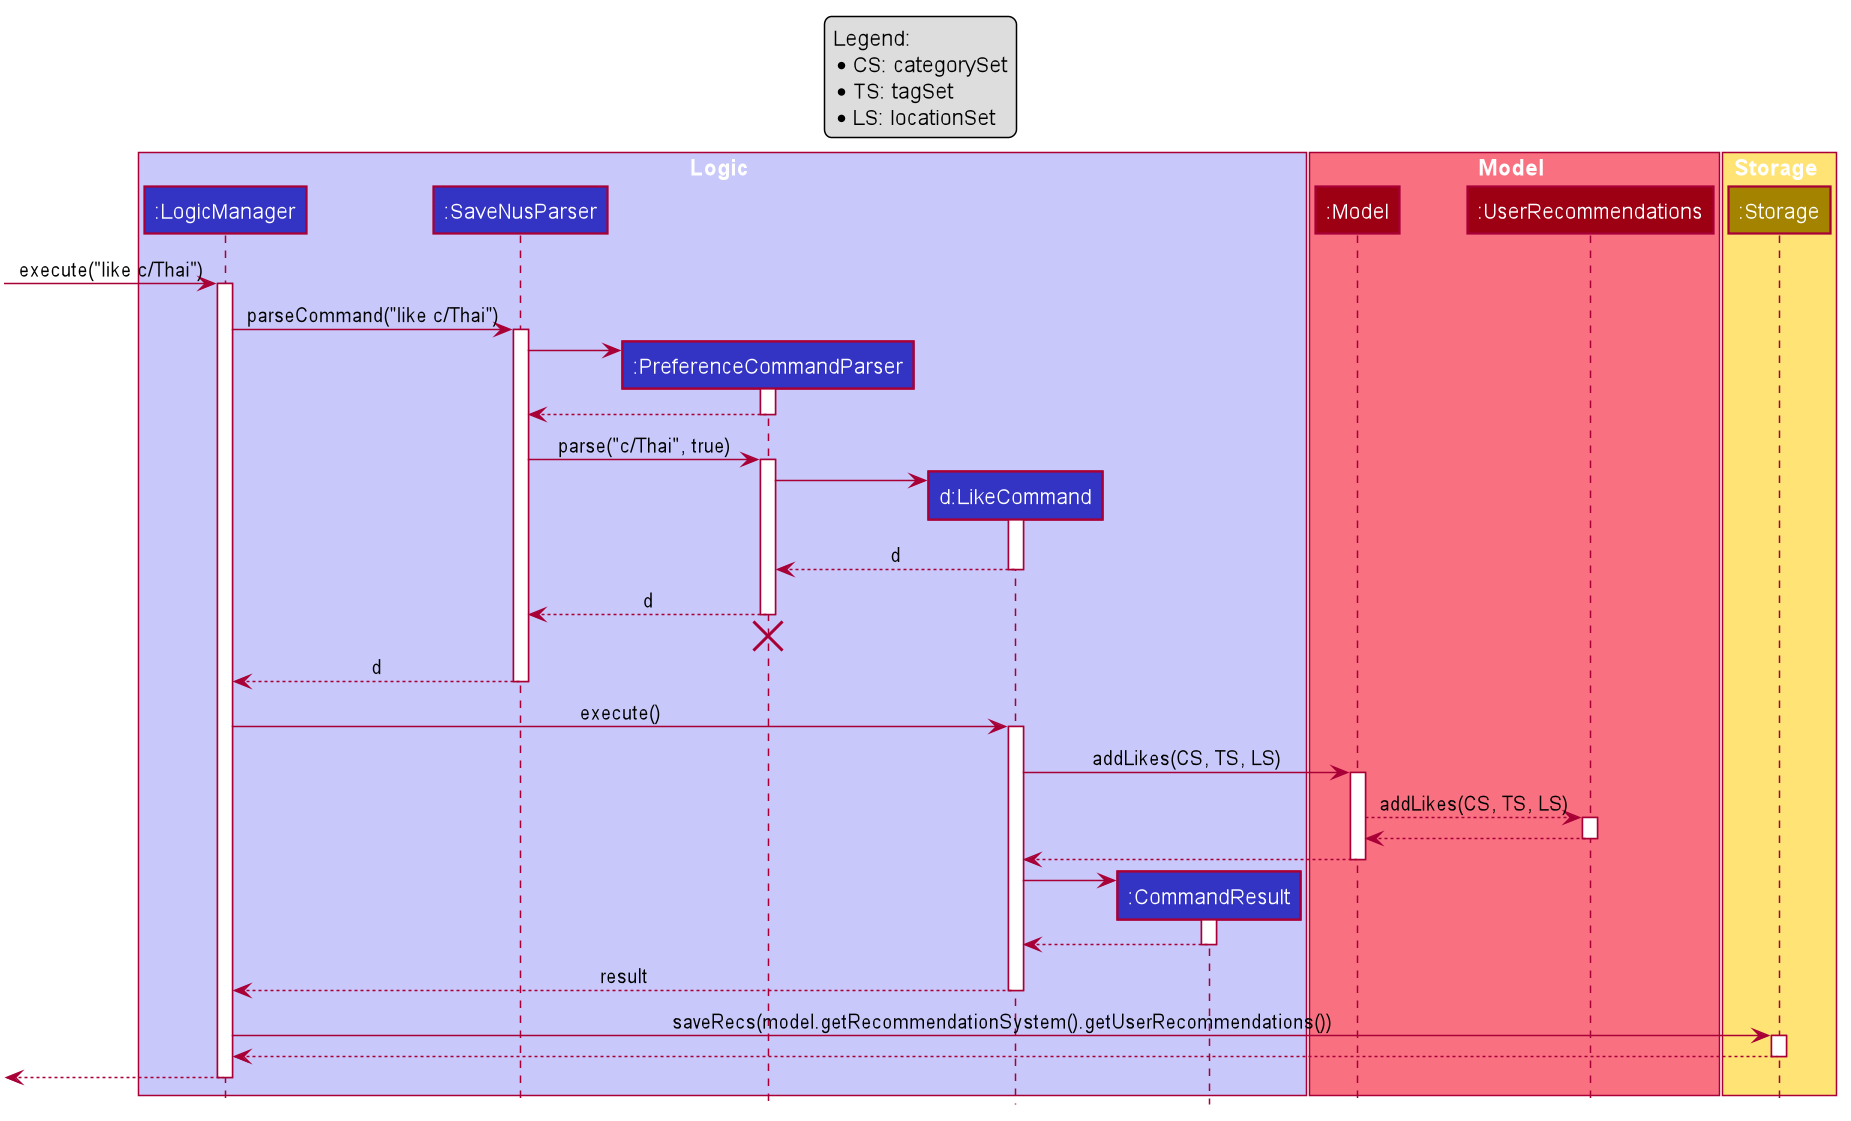
The following activity diagram below summarizes how the like command works:
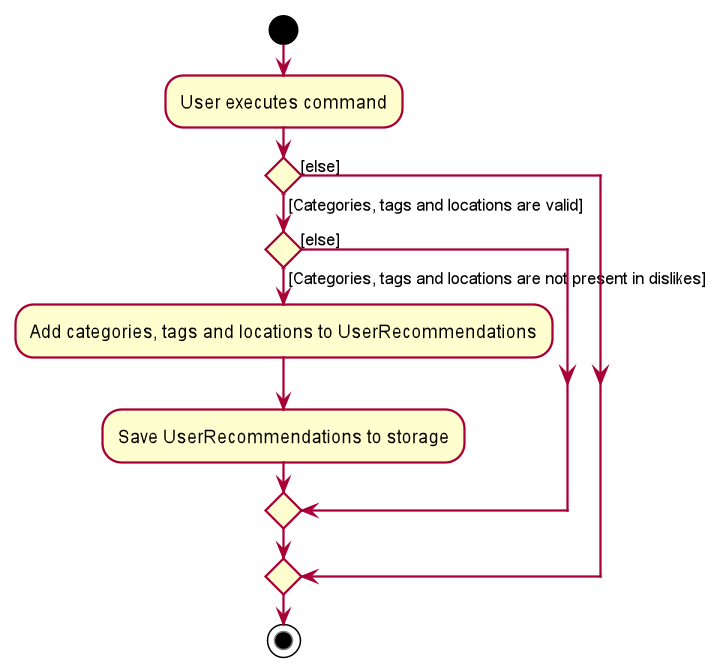
A similar execution sequence is performed for a dislike command by replacing instances of like with dislike and vice versa.
4.7.3. Displaying recommendations
After customizing the user’s likes and dislikes, users can obtain a personalized list of recommendations
using the recommend command.
Each food is passed to the recommendation system and it calculates the recommendation value based on the tables below:
| Condition 1 | Condition 2 | Bonus |
|---|---|---|
Food tags match the user’s liked tags |
1 or more tags |
+0.05 and +0.03 per matching tag |
3 or more tags |
+0.10 and +0.03 per matching tag |
|
5 or more tags |
+0.25 and +0.03 per matching tag |
|
Food category matches the user’s liked categories |
N/A |
+0.15 |
Food location matches the user’s liked locations |
N/A |
+0.10 |
Food tags match the user’s tags in purchase history |
N/A |
+0.01 per matching tag |
Food category matches the user’s categories in purchase history |
N/A |
+0.02 |
Food location matches the user’s locations in purchase history |
N/A |
+0.03 |
Food purchase is found in user’s purchase history |
2 or more purchases |
+0.10 |
5 or more purchases |
+0.30 |
|
10 or more purchases |
+0.50 |
| Condition 1 | Condition 2 | Penalty |
|---|---|---|
Food price is out of the user’s current budget |
N/A |
Removes the item from the recommendation results |
Food tags match the user’s disliked tags |
1 or more tags |
-0.10 and -0.10 per matching tag |
2 or more tags |
-0.30 and -0.10 per matching tag |
|
3 or more tags |
-0.50 and -0.10 per matching tag |
|
Food category matches the user’s disliked categories |
N/A |
-0.40 |
Food location matches the user’s disliked locations |
N/A |
-0.30 |
Food purchase is found in user’s purchase history |
Within a time period of <2 days |
Applies a decreasing penalty from -10 which diminishes to 0 after 2 days |
The activity diagram below shows how a sample Food is passed into RecommendationSystem to output a
recommendation value:

RecommendationSystem#calculateRecommendationThe calculated recommendation values are used to sort the food items when the recommend command
is executed. Food with similar recommendation values are sorted based on their price.
4.7.4. Design Considerations
Detailed below are the design considerations taken into account when engineering the Recommendation System.
Design Considerations of RecommendationSystem class
Explained below are our considerations when designing the RecommendationSystem class.
| Alternative 1 (Chosen Implementation) | Alternative 2 |
|---|---|
Implement
|
Implement
|
Design Considerations of RecommendationSystem#calculateRecommendation() function.
Explained below are our considerations when designing the RecommendationSystem#calculateRecommendation() function.
| Alternative 1 (Chosen Implementation) | Alternative 2 |
|---|---|
Declare a static method
|
Have a field (e.g.
|
4.8. Alias feature
The alias feature allows users to generate their own unique aliases for commands in $aveNUS. This can be
done using the alias command.
4.8.1. Classes for alias feature in Model
With the addition of the alias feature, a new set of classes were implemented to support the feature.
A class AliasList encapsulates methods and classes related to this feature. It contains a list of
AliasPair which stores the alias word, if any, mapped to the command word in the AliasList.
Additionally, an AliasChecker is implemented to help check the validity of the AliasPair in the
AliasList. Finally, a CommandWordAdder was implemented such that on the creation of a new AliasList,
all command words in $aveNUS will have their mapped alias words removed, being replaced by an empty String.
The class diagram below illustrates the relationship between the classes.

4.8.2. Mapping an alias word to a command word.
The main command behind the alias feature is alias. The user can assign an alias word to a command word
in $aveNUS, as long as the alias word is alphanumeric.
For example, alias sort s sets the alias word for the command word sort to become s.
The sequence diagram below shows how a sample alias command is executed.

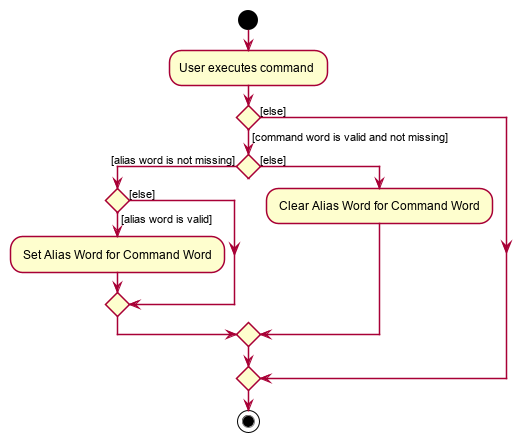
The following activity diagram below shows how the alias command works.
4.9. Info Feature
The info feature allows users to view more information about a particular command. This can be done through calling the
info command.
4.9.1. Classes for info feature in Model
In order to support the info command, new classes were added that correspond to each command in the app.
This is to allow for easy access and also to better organize the information to be displayed for each commands.
These classes only has public fields without any methods as it is only needed by InfoWindow to access the information
Here are some example classes: AddInfo, AliasInfo, AutoSortInfo, BudgetInfo
Each of these classes contains these fields:
-
Command Word
-
Information
-
Usage example
-
Expected Output
Each of these fields have to be manually typed as it acts like an in-built user guide for the users who do not have access to internet connection, but would still like to know about the command.
4.9.2. Opening info card about a command
Command word to open up a new InfoWindow is info. Users are able to view the InfoWindow for each and every command
as long as the command exist within the app (There exist the class for such info card in the model).
For example, info add will open up a new InfoWindow about the command add.
The sequence window below shows how a sample info command is executed:
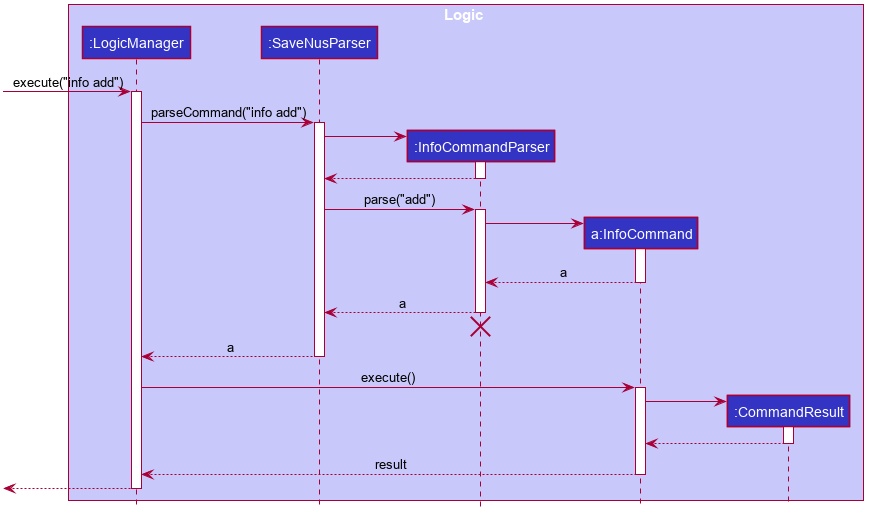
info commandThe following activity diagram shows how the info command works.

info command4.9.3. Design Considerations
Detailed below are our considerations when creating the Info feature.
Design considerations of InfoCommand class
Explained below are our consideration when designing the InfoCommand class.
| Alternative 1 (Chosen Implementation) | Alternative 2 |
|---|---|
Returning a specific message for each input command to create specific
|
Simply returning the input command’s output message.
|
We decided to go with alternative 1 and implemented InfoCommand class to just return a specific message for each
and every input command. Not only that this is much safer but this also allows similar commands to have standardized
output message e.g. like command and dislike command.
The hassle of having to create new field and object to be returned for every new command added is mitigated by the fact that we will not have to worry about similar output message for the commands resulting in a bug in the info feature.
Additionally, this implementation also allows a unique output message to be displayed on the ResultDisplay which
definitely adds more personality to the program and allows a better, more informative feedback to user to be displayed.
Basically the benefits of this implementation as mentioned, greatly outweighs the cost it takes to implement it and subsequent command addition would be much easier as it’s just repeated routine.
Design considerations on how to display the command’s information
Explained below are our consideration when designing on the best way to display the command’s information.
| Alternative 1 (Chosen Implementation) | Alternative 2 |
|---|---|
Creating
|
Displaying the information on the
|
We decided to go with alternative 1 where we just create a new window called InfoWindow to display the information.
Firstly, this allows us to format the information in a way to make it easy for the users to understand. Secondly, we
are able to fit so much more information in the new window and even possibly image guides which would definitely
help users understand the commands better.
Displaying the information on the ResultDisplay simply would not be helpful enough to the users especially with
information-heavy commands such as add and edit which would definitely not fit the small ResultDisplay screen.
4.10. Theme Feature
The theme feature allows users to change the look of the app. This can be done through calling the
theme command.
4.10.1. Changing the theme of the app
Command word to change the theme is theme. Currently there are only two themes available which are light and dark
theme. As such, the only valid commands are theme dark or theme light.
The sequence window below shows how a sample theme command is executed:
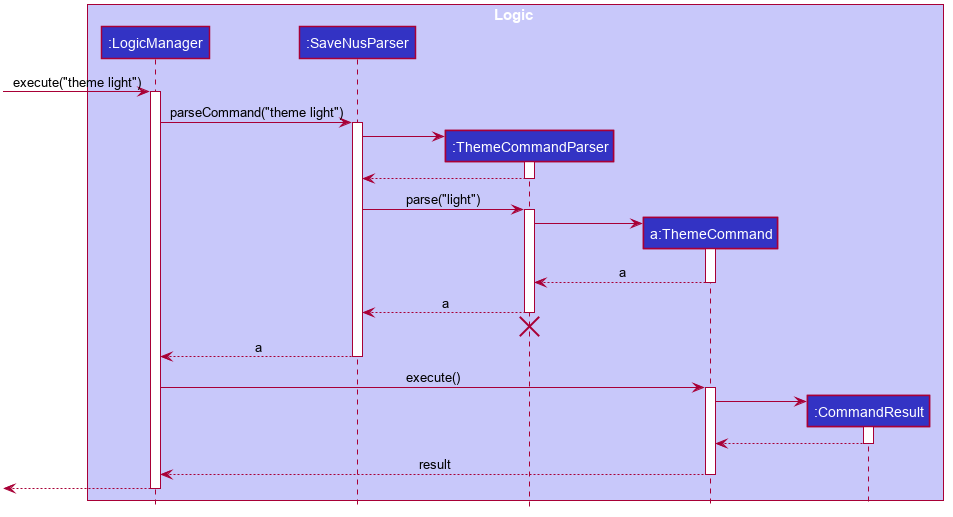
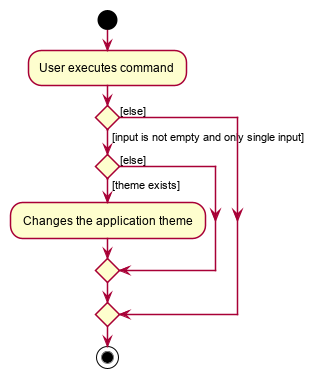
theme commandThe following activity diagram shows how the theme command works.
theme command4.10.2. Design Considerations
Detailed below are our considerations when creating the Theme feature.
Design considerations on how to implement the theme change
Explained below are our consideration when designing method to change the theme.
| Alternative 1 (Chosen Implementation) | Alternative 2 |
|---|---|
Using CSS styling and just simply changing the
|
Creating a class that automates the theme change according to color scheme.
|
We decided to go with alternative 1 and utilize StyleSheet instead of creating a class that automates the theme change.
This greatly improve the customization between themes and much easier to implement. THe greater customization option
allows for different themes to look distinct and also look better.
This implementation also allows for better organization of the themes which makes it easy to keep track of the different themes available. The space taken up by repeated components is not that heavy since the app itself is light.
5. Documentation
5.1. Introduction
We use asciidoc for writing documentation.
| We chose asciidoc over Markdown because asciidoc, although a bit more complex than Markdown, provides more flexibility in formatting. |
5.2. Editing Documentation
See UsingGradle.adoc to learn how to render .adoc files locally to preview the end result of your edits.
Alternatively, you can download the AsciiDoc plugin for IntelliJ, which allows you to preview the changes you have made to your .adoc files in real-time.
5.3. Editing Diagrams
See UsingPlantUml.adoc to find out how to create and update the UML diagrams in the developer guide.
5.4. Publishing Documentation
See UsingTravis.adoc to learn how to deploy GitHub Pages using Travis.
5.5. Converting Documentation to PDF format
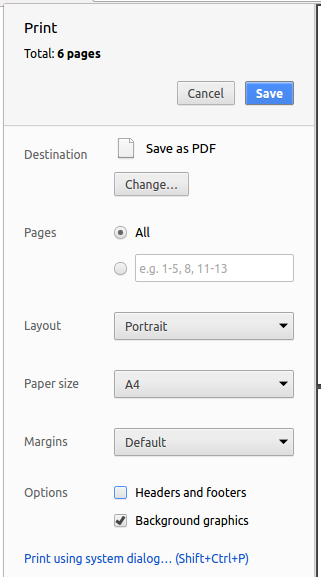
We use Google Chrome for converting documentation to PDF format, as Chrome’s PDF engine preserves hyperlinks used in webpages.
Here are the steps to convert the project documentation files to PDF format.
-
Follow the instructions in UsingGradle.adoc to convert the AsciiDoc files in the
docs/directory to HTML format. -
Go to your generated HTML files in the
build/docsfolder, right click on them and selectOpen with→Google Chrome. -
Within Chrome, click on the
Printoption in Chrome’s menu. -
Set the destination to
Save as PDF, then clickSaveto save a copy of the file in PDF format. For best results, use the settings indicated in the screenshot below.
5.6. Site-wide Documentation Settings
The build.gradle file specifies some project-specific asciidoc attributes which affects how all documentation files within this project are rendered.
Attributes left unset in the build.gradle file will use their default value, if any.
|
| Attribute name | Description | Default value |
|---|---|---|
|
The name of the website. If set, the name will be displayed near the top of the page. |
not set |
|
URL to the site’s repository on GitHub. Setting this will add a "View on GitHub" link in the navigation bar. |
not set |
|
Define this attribute if the project is an official SE-EDU project. This will render the SE-EDU navigation bar at the top of the page, and add some SE-EDU-specific navigation items. |
not set |
5.7. Per-file Documentation Settings
Each .adoc file may also specify some file-specific asciidoc attributes which affects how the file is rendered.
Asciidoctor’s built-in attributes may be specified and used as well.
Attributes left unset in .adoc files will use their default value, if any.
|
| Attribute name | Description | Default value |
|---|---|---|
|
Site section that the document belongs to.
This will cause the associated item in the navigation bar to be highlighted.
One of: * Official SE-EDU projects only |
not set |
|
Set this attribute to remove the site navigation bar. |
not set |
5.8. Site Template
The files in docs/stylesheets are the CSS stylesheets of the site.
You can modify them to change some properties of the site’s design.
The files in docs/templates controls the rendering of .adoc files into HTML5.
These template files are written in a mixture of Ruby and Slim.
|
Modifying the template files in |
6. Testing
6.1. Running Tests
There are two ways to run tests.
Method 1: Using IntelliJ JUnit test runner
-
To run all tests, right-click on the
src/test/javafolder and chooseRun 'All Tests' -
To run a subset of tests, you can right-click on a test package, test class, or a test and choose
Run 'ABC'
Method 2: Using Gradle
-
Open a console and run the command
gradlew clean test(Mac/Linux:./gradlew clean test)
| See UsingGradle.adoc for more info on how to run tests using Gradle. |
6.2. Types of tests
We have three types of tests:
-
Unit tests targeting the lowest level methods/classes.
e.g.seedu.savenus.commons.StringUtilTest -
Integration tests that are checking the integration of multiple code units (those code units are assumed to be working).
e.g.seedu.savenus.storage.StorageManagerTest -
Hybrids of unit and integration tests. These test are checking multiple code units as well as how the are connected together.
e.g.seedu.savenus.logic.LogicManagerTest
6.3. Troubleshooting Testing
Problem: Keyboard and mouse movements are not simulated on macOS Mojave, resulting in GUI Tests failure.
-
Reason: From macOS Mojave onwards, applications without
Accessibilitypermission cannot simulate certain keyboard and mouse movements. -
Solution: Open
System Preferences, clickSecurity and Privacy→Privacy→Accessibility, and check the box besideIntellij IDEA.
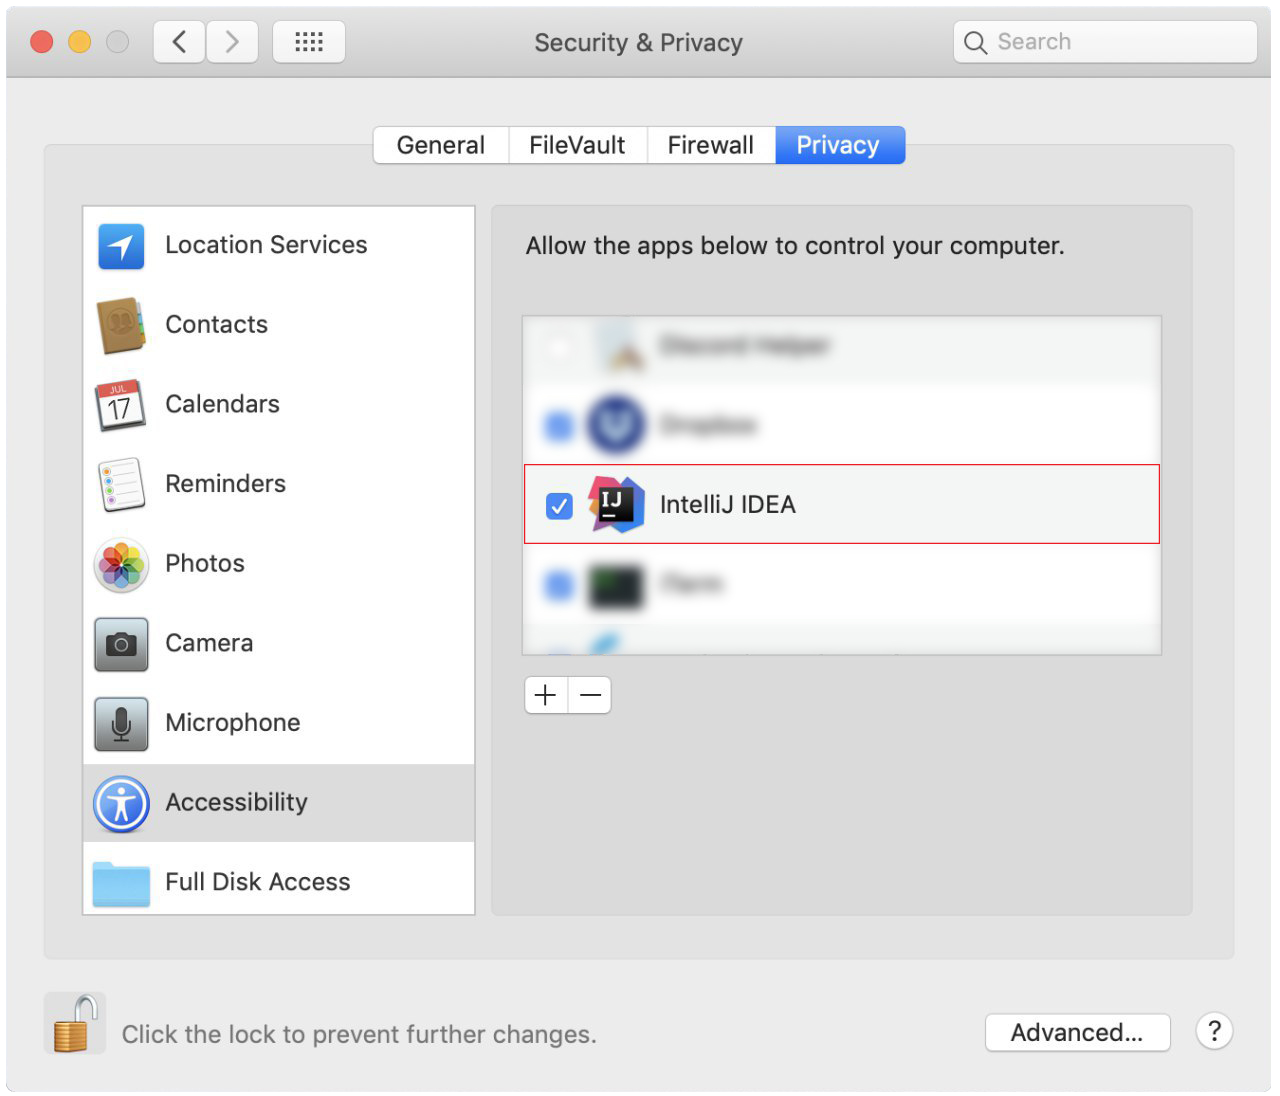
Accessibility permission is granted to IntelliJ IDEA7. Dev Ops
7.1. Build Automation
See UsingGradle.adoc to learn how to use Gradle for build automation.
7.2. Continuous Integration
We use Travis CI and AppVeyor to perform Continuous Integration on our projects. See UsingTravis.adoc and UsingAppVeyor.adoc for more details.
7.3. Coverage Reporting
We use Coveralls to track the code coverage of our projects. See UsingCoveralls.adoc for more details.
7.4. Documentation Previews
When a pull request has changes to asciidoc files, you can use Netlify to see a preview of how the HTML version of those asciidoc files will look like when the pull request is merged. See UsingNetlify.adoc for more details.
7.5. Making a Release
Here are the steps to create a new release.
-
Update the version number in
MainApp.java. -
Generate a JAR file using Gradle.
-
Tag the repo with the version number. e.g.
v0.1 -
Create a new release using GitHub and upload the JAR file you created.
7.6. Managing Dependencies
A project often depends on third-party libraries. For example, $aveNUS depends on the Jackson library for JSON parsing. Managing these dependencies can be automated using Gradle. For example, Gradle can download the dependencies automatically, which is better than these alternatives:
-
Include those libraries in the repo (this bloats the repo size)
-
Require developers to download those libraries manually (this creates extra work for developers)
Appendix A: Product Scope
Target user profile:
-
Has a need to manage a significant number of food items
-
Has trouble tracking expenditure over a period of time
-
Wants to know how much money they have saved
-
Wants meal recommendations within their specified budget
-
Prefer desktop apps over other types
-
Can type fast
-
Prefers typing over mouse input
-
Reasonably comfortable using CLI apps
-
Able to read graphs and data.
Value proposition: manage expenditure and get recommendations faster than a typical mouse/GUI driven app
Appendix B: User Stories
Priorities: High (must have) - * * *, Medium (nice to have) - * *, Low (unlikely to have) - *
| Priority | As a / an … | I want to … | So that I can… |
|---|---|---|---|
|
forgetful user |
track my expenditure for the day using the app |
know how much I have already spend in the day and plan for the remaining meals of the day. |
|
greedy user |
have reminders when I am about to hit the limits I set for my expenditure |
plan my budget better for the weeks ahead. |
|
meticulous user |
sort the food items based on categories |
see which items are the best or worst based on certain categories. |
|
new user |
view more information about command |
learn how to use the app and its features. |
|
user |
add a food item by specifying the item, price, description and category |
update the food items that are available to me if I find new food item options within NUS. |
|
user |
know the total amount I have spent |
plan my finances for the remaining days of the month. |
|
user |
only be able to see what I can afford for meals and beverages |
save time scrolling through meals that fit my budget. |
|
user |
possess the ability to update existing food entries |
update the existing food entries if there are changes in their prices/descriptions. |
|
advanced user |
shorten my commands |
type faster and more efficiently. |
|
careful user |
have a calendar function |
keep track of the progress of my spending for the current month |
|
japanese food lover |
prioritise Japanese food options over other similarly priced products |
find specific food types of our choice/cravings we have. |
|
lazy user |
have autocomplete |
find food items without having to type long keywords. |
|
lazy user |
load and save data from other computers |
transfer data to an application onto another desktop. |
|
lazy user |
obtain a recommended meal plan according to a specified daily allowance |
save the time of having to plan for my meals for the day. |
|
non-tech savvy user |
have an easier way to understand how the works eg. through a video |
use the app effectively without having to read long user guides. |
|
slow user |
a guided tutorial to bring me through the basic functionality of the program |
become more familiar with the program before I start using. |
|
smart user |
put aliases to the commands available in the application |
personalise the app and use it more effectively. |
|
user |
add my savings of the month into a customised fund |
purchase rewards/gifts/items that I require when I have saved enough for them. |
|
user |
know the opening and closing timings of the food stores in NUS |
closed shops are not recommended to me to prevent me from wasting time to travel to these shops. |
|
user with dietary/religious restrictions |
exclude meals that do not fulfil my dietary requirements |
reduce my options to only meals that I can consume. |
|
dyslexic user |
an app with easy to read font |
use the app comfortably with being hindered by my reading disabilities. |
|
forgetful user |
save specific meal sets to reuse |
save time on inputting my meals daily. |
|
user |
add the birthdays of my friends |
set up reminders to buy gifts for my friends. |
|
user |
receive sample suggestions and examples to understand how to use the program. |
understand how to user the application effectively. |
|
user who hates travelling |
sort places from the nearest to the furthest from my current location |
find food places that are easy for me to get to. |
|
user who loves to customize things |
have a theme changing function of the app from a list of themes available |
personalise the app to a theme that I like. |
|
user with ADHD |
an app with simple commands and UI |
use it comfortably without major distractions. |
Appendix C: Use Cases
(For all use cases below, the System is the Menu and the Actor is the user, unless specified otherwise)
Use case: Add food item
MSS
-
User requests to add food item, providing details such as price, description, category, location and so on.
-
$aveNUS adds the food item.
Use case ends.
Extensions
-
1a. The details are given in the wrong format or mandatory fields are omitted.
-
1a1. $aveNUS diplays an error message.
Use case resumes at step 1.
-
Use case: Delete food item
MSS
-
User requests to delete a specific food item in the observable food list.
-
$aveNUS deletes the food item.
Use case ends.
Extensions
-
2a. The list is empty.
Use case ends.
-
3a. The given index is invalid.
-
3a1. $aveNUS shows an error message.
Use case resumes at step 2.
-
Use case: Search food item
MSS
-
User requests to search for a food item, providing a search query.
-
$aveNUS shows a list of filtered food items according to their provided query.
Use case ends.
Extensions
-
2a. User requests to add food item to their expenditure from the search results.
-
2a1. $aveNUS adds the food item to their expenditure.
Use case ends.
-
-
2b. User requests to search without providing any query.
-
2b1. $aveNUS displays the normal ordering of food items.
Use case ends.
-
Use case: Add likes / dislikes
MSS
-
User requests to add likes or dislikes, providing the list of liked categories, tags and locations.
-
$aveNUS adds the likes or dislikes into the system.
Use case ends.
Extensions
-
1a. The user attempts to add a like that already exists as a dislike, or vice versa.
-
1a1. $aveNUS shows an error message.
Use case ends.
-
-
1b. The given categories, tags or locations are invalid.
-
1b1. $aveNUS shows an error message.
Use case ends.
-
Use case: Display recommendations
MSS
-
User requests to list recommendations.
-
$aveNUS shows a list of recommended food items based on their specified budget.
-
User requests to add a specific food item in the list into purchased food items.
-
$aveNUS adds the food item into list of purchased food items.
Use case ends.
Extensions
-
2a. The list is empty.
Use case ends.
-
3a. The given index is invalid.
-
3a1. $aveNUS shows an error message.
Use case resumes at step 2.
-
Use case: Save money into a savings account
MSS
-
User requests to add savings to Savings Account.
-
$aveNUS adds the list of savings in the Savings History display tab.
Use case ends.
Extensions
-
1a. The wallet is empty.
-
1a1. $aveNUS shows an error message to tell the user to topup the wallet.
-
1a2. $aveNUS displays Savings History display tab.
-
1a3. $aveNUS displays an empty command box.
Use case ends.
-
Use case: Set budget
MSS
-
User requests to set budget.
-
$aveNUS calculates the daily budget based on the specified weekly budget.
Use case ends.
Extensions
-
1a. The budget set is invalid (such as a negative number).
-
1a1. $aveNUS shows an error message.
Use case resumes at step 1.
-
Use case: Set Aliases
MSS
-
User requests to set an alias, providing a command word and an alias word.
-
$aveNUS checks if the command and alias words are valid, and sets the alias word of the command word.
Use case ends.
Extensions
-
1a. The alias word given happens to be a command word.
-
1a1. $aveNUS shows an error message.
Use case resumes at step 1.
-
-
1b. The command word given is not a valid command word of $aveNUS.
-
1b1. $aveNUS shows an error message.
Use case resumes at step 1.
-
Appendix D: Non Functional Requirements
-
Should work on any mainstream OS that has JDK 11 installed.
-
Should be usable by user with novice computing experience.
-
Should be able to respond to user input within 2 seconds.
-
Should be able to run fullscreen without any UI issues.
-
Should be able to read easily by users.
Appendix F: Instructions for Manual Testing
Given below are instructions to test the app manually.
| These instructions only provide a starting point for testers to work on; testers are expected to do more exploratory testing. |
F.1. Launch and Shutdown
-
Initial launch
-
Download the jar file and copy into an empty folder
-
Double-click the jar file
Expected: Shows the GUI with a set of sample food items. The window size may not be optimum.
-
-
Saving window preferences
-
Resize the window to an optimum size. Move the window to a different location. Close the window.
-
Re-launch the app by double-clicking the jar file.
Expected: The most recent window size and location is retained.
-
F.2. Adding a Food Item
-
Adding a Food Item
-
Prerequisites: The food list in the menu has to be empty.
-
Test case:
add n/Chicken Rice p/5.00 c/Chinese
Expected: A new food item is shown in the food list. Details of the food item will be shown to the user. -
Test case:
add n/Chicken Rice p/5.00 c/Chinese
Expected: An error message will appear. The duplicate food item will not be added as the food item has been already added from the first test case. -
Test case:
add n/Chicken Rice p/5.00
Expected: An error message will appear. The food needs to have the compulsory field ofCATEGORY.
-
F.3. Deleting a Food Item
-
Deleting a Food Item
-
Prerequisites: There has to be a food item in the menu for the user to delete.
-
Test case:
delete 1
Expected: First food item is deleted from the food list. A confirmation message will be shown to indicate successful deletion. -
Test case:
delete 0
Expected: No food item is deleted. Error details shown in the status message. -
Other incorrect delete commands to try:
delete,delete x(where x is larger than the list size)
Expected: Similar to previous.
-
F.4. Adding like and dislikes
-
Adding likes and dislikes
-
Test case:
like c/chinese t/spicy l/location
Expected: The provided categories, tags and locations are added into the like list. Details of the list of likes and dislikes are shown in the status message. -
Test case:
dislike c/chinese(after running the above command)
Expected: The dislike is not added because the categorychinesealready exists in the user’s likes.
-
F.5. Removing likes and dislikes
-
Removing likes and dislikes
-
Prerequisites: There has to be a like or dislike in the system for the user to remove.
-
Test case:
removelike c/chinese
Expected: The categorychineseis deleted from the user’s likes. Details of the list of likes and dislikes are shown in the status message. -
Test case
removelike c/chinese(after running the above command)
Expected: The command fails because there is no morechinesecategory present in the user’s likes.
-
F.6. Clearing likes and dislikes
-
Clearing likes and dislikes
-
Prerequisites: Optimally, there should be likes or dislikes present in the system for the user to remove. However, the command still works even if there are no likes or dislikes present.
-
Test case:
removelike ALL
Expected: All likes are cleared. -
Test case
removedislike ALL
Expected: All dislikes are cleared.
-
F.7. Obtaining a list of recommendations
-
Obtaining a list of recommendations
-
Prerequisites: Budget and days to expiry of the budget are set by the user. The budget should also be set high enough such that the user is able to purchase food items when the recommendation system calculates the optimal daily budget.
-
Test case:
recommend
Expected: A list of recommendations tailored to the user will appear, taking into account factors such as the user’s liked and disliked categories, tags and locations and so on. All factors affecting the recommendation system’s recommendation value are documented in the User Guide and Developer Guide.
-